
Choose the blog language
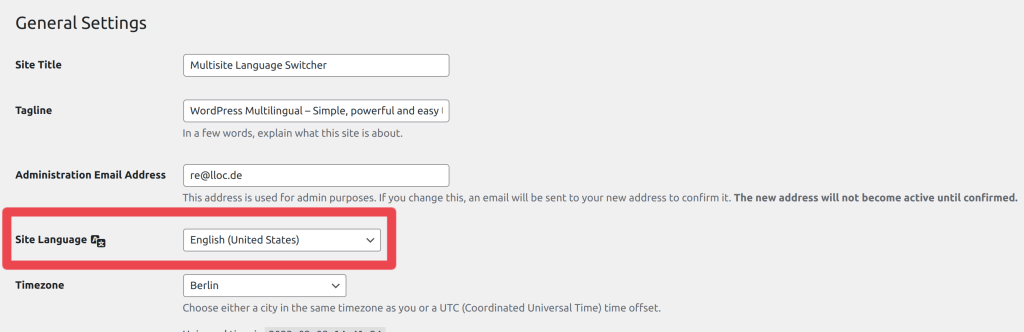
In order to choose the blog language, go to the administration menu, to Settings/General and choose the language in the select menu.
It might be much easier for the first steps if the downloaded version of WordPress includes at least one additional language.
See the following articles:
Install & activate the plugin
To install the plugin, follow these steps:
- Navigate to your WordPress dashboard and select Plugins > Add new.
- Use the search bar located in the top right corner of the page to search for “Multisite Language Switcher”.
- A list of results will appear. Once you’ve found the plugin, click “Install Now.”
- Once the installation is complete, you’ll need to activate the plugin by clicking on “Activate”.
Read on here: https://wordpress.org/documentation/article/manage-plugins/
Settings in the administration menu
The plugin settings are quite simple (located in the Administration Menu -> Settings -> Multisite Language Switcher). To activate the plugin, you must first click “Save” at the bottom of the settings page, even if you haven’t made any changes yet. This is necessary for the plugin to offer the required flexibility, such as for each language.
You will also see a select menu, similar to the options page in the general settings, that displays the language set for the current website.
Main settings
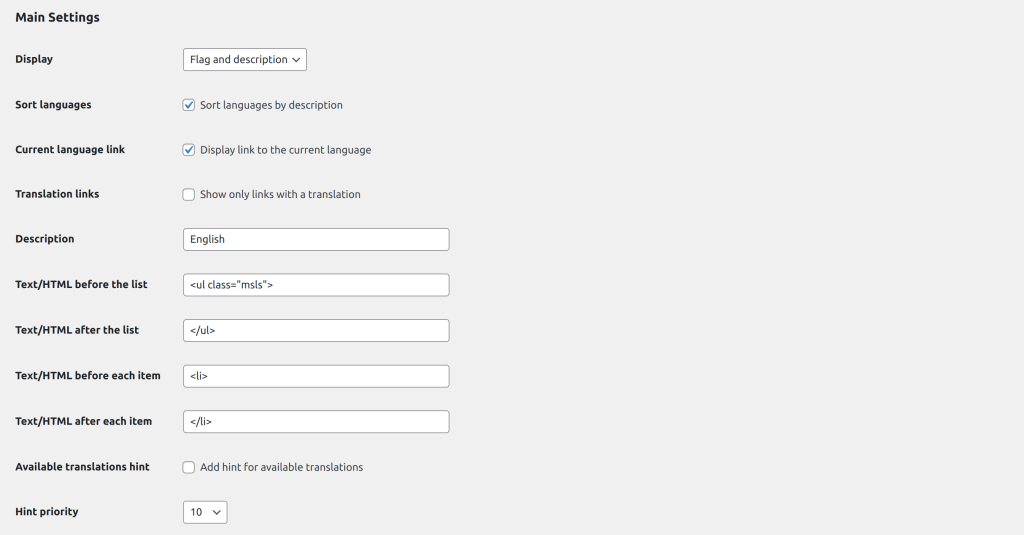
Display
You can choose 4 types for the output:
- flag and description
- flag only
- description only
- description and flag
Sort languages
This option allows the user to sort the output of the plugin based on the values that are set in the “Description” field. By default, the output is sorted based on the language code (e.g., “de_DE”, “it_IT”, “en_GB,” etc.).
current language LINK
This option allows the user of the plugin to choose whether or not to include a link to the current content in the output of the plugin. By default, this link is not included, but if the user selects this option, a link to the current content will be displayed. This could be particularly useful if the user wants to display a flag for the current language.
translation LINKS
When this option is enabled, the plugin will only display links to existing translations. If there is no translation available for the current content, no link will be displayed.
On the other hand, if this option is not selected, and there is no translation available, the plugin will display a link to the homepage of the website. This can be useful for directing users to the main page of the website, even if the content they were looking for is not available in their language.
Description
The value entered in this field will be used as the title attribute for the images and text links. If this field is left empty, the language code will be displayed as a fallback (e.g., “de_DE”, “it_IT”, “en_GB,” etc.).
Text/HTML fields
With the next 4 fields, it is possible to add some text or code HTML in order to personalise the HTML list to appear on the front end when your use the plugin.
Add hint for available translations
Indicate to the visitor the available languages available to read the post. This is a textual output under the post.
Hint priority
You can decide which priority the plugin should apply for the translation hints. The output uses the WordPress event for the_content and there are many plugins that change the output. You could assign a higher number for being the last function that alters the content.
Advanced settings
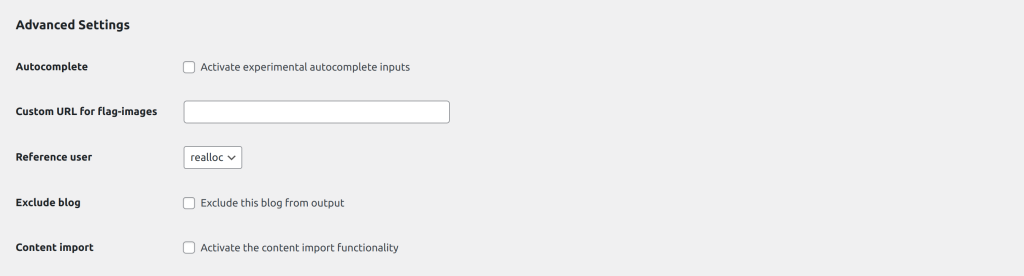
Activate experimental autocomplete inputs
This will show an autocomplete input in the editor’s sidebar instead of a dropdown for available content in the connected sites.
I decided to let this experimental since there are issues in the taxonomies.
Custom URL for flag images
There are flag images included but you can set also a custom directory if you have your own set.
Reference user
This is an important but somewhat overseen field.
The easiest (but not the only one) way to connect websites is by the user. There is no problem if you have just one user that accesses all the websites. But this option is useful if you want to connect a subset or if you have more than 1 admin.
Just set who is the reference for the connections and you are done.
Exclude this blog from the output
This option plays together with the “Reference user”. You can just exclude a blog and the plugin will not do anything on that website.
Activate the content import functionality
Activate this new functionality if you need to copy the original content with meta and media to a new translation.
Rewrite settings
This part is mostly read-only and shows if there are any slugs translated. The plugin can save the translated slug and use it to create the correct connection.
Editing association of contents »
This post is also available in Deutsch.